
close
Choose Your Site
Global
Social Media
Views: 0 Author: Site Editor Publish Time: 2025-09-10 Origin: Site
You might wonder how a low power microscope is different from a high power objective. A low power microscope helps you see bigger parts of a specimen. It uses less magnification, so you can scan and find things easily. High power objectives let you see small details. But they show a smaller area and need careful focusing. Many students think all microscopes work the same. This is not true. Some common mistakes are:
Not using a cover slip, which can make your image blurry.
Starting with high magnification, which makes it hard to find things.
Using immersion oil the wrong way, which makes the image worse.
Low power microscopes let you see bigger parts of a specimen. They are good for people who are just starting. You can scan slides easily with them.
High power objectives help you see very small details. Low power cannot show these tiny things. Use high power to study cells and bacteria.
Always begin with low power to find your specimen. Change to high power if you want to see more detail. Be careful when you focus at high power.
Low power microscopes show a wide field of view. High power microscopes show a smaller area but with more detail.
It is easier to prepare samples for low power. High power needs careful cutting and staining. This helps you see small parts clearly.
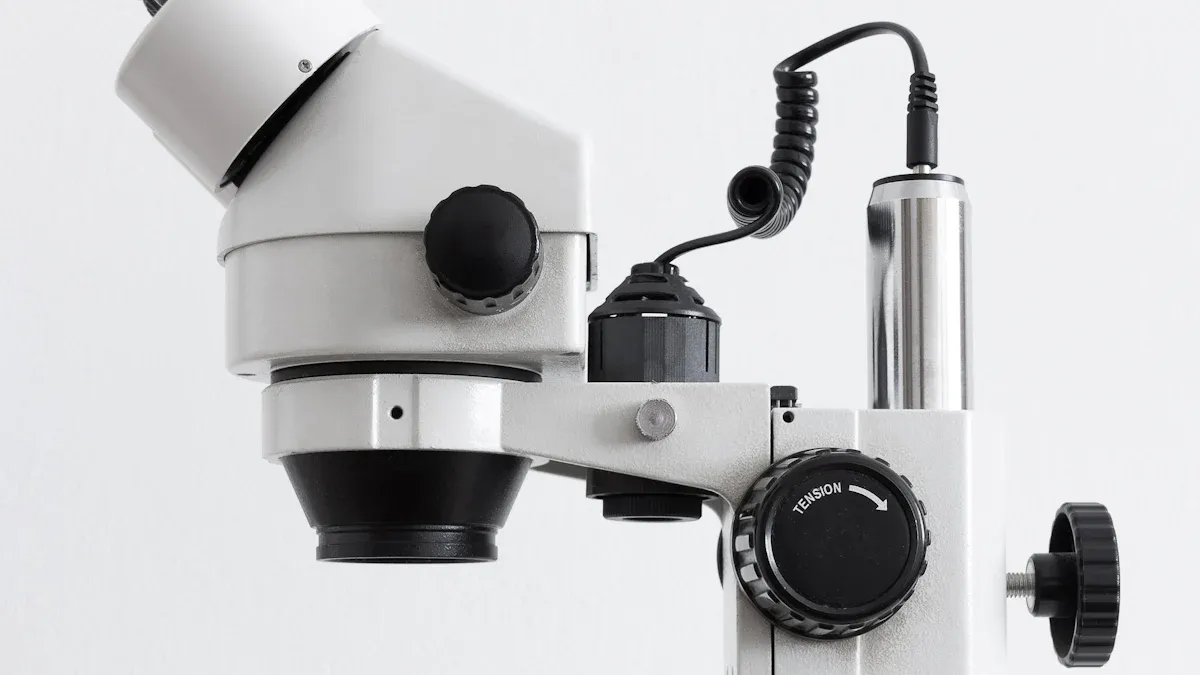
Image Source: unsplash
A low power microscope lets you see bigger parts of your specimen. It uses magnification from 2.5x up to 100x. Stereomicroscopes are a type of low power microscope. You can look at slides or larger objects easily. You will not lose track of what you are viewing. This magnification helps you find the area you want to study. Then you can switch to higher power if needed.
Magnification range for low power microscope:
2.5x to 100x
Most common settings: 4x and 10x
A low power microscope shows a wide field of view. You can see more of your specimen at one time. This makes it easier to find interesting areas. High power microscopes show a much smaller field of view. The table below shows how the field of view changes with different display resolutions:
| Display Resolution | HPF Area Comparison to Light Microscope HPF |
|---|---|
| 1920 × 1080 | Nearly 50% smaller than light microscope HPF |
| Microsoft Surface Studio | Equivalent to 16.9 HPF area of conventional microscope (×10/20 mm ocular, ×40 objective) |
Low power microscopes give you a greater depth of field. You can focus on thicker specimens and see more layers at once. The depth of field depends on magnification and numerical aperture. Here is a table that shows how depth of field changes:
| Magnification | Numerical Aperture | Depth of Field (µm) |
|---|---|---|
| 4x | 0.10 | 55.5 |
| 10x | 0.25 | 8.5 |
You can use a low power microscope for many things in biology and geology. It helps you scan slides and look at bigger specimens. You can find the area you want to study. In geology, you can use it to look at rocks and minerals. Here are some common uses:
| Application Area | Description |
|---|---|
| Igneous rocks | Find out how crystals formed and magma changed. |
| Metamorphic rocks | Learn about pressure, temperature, and rock changes. |
| Sedimentary rocks | Study grains, cement, and spaces in rocks. |
Tip: Use a low power microscope first to find your specimen. Then switch to higher magnification if you need to see more detail.
A low power objective is a lens for scanning and seeing bigger areas. Its numerical aperture is usually between 0.12 and 0.87. This makes it easy to focus and see more of your specimen. Low power objectives are good for beginners. They help you find the area you want to study.
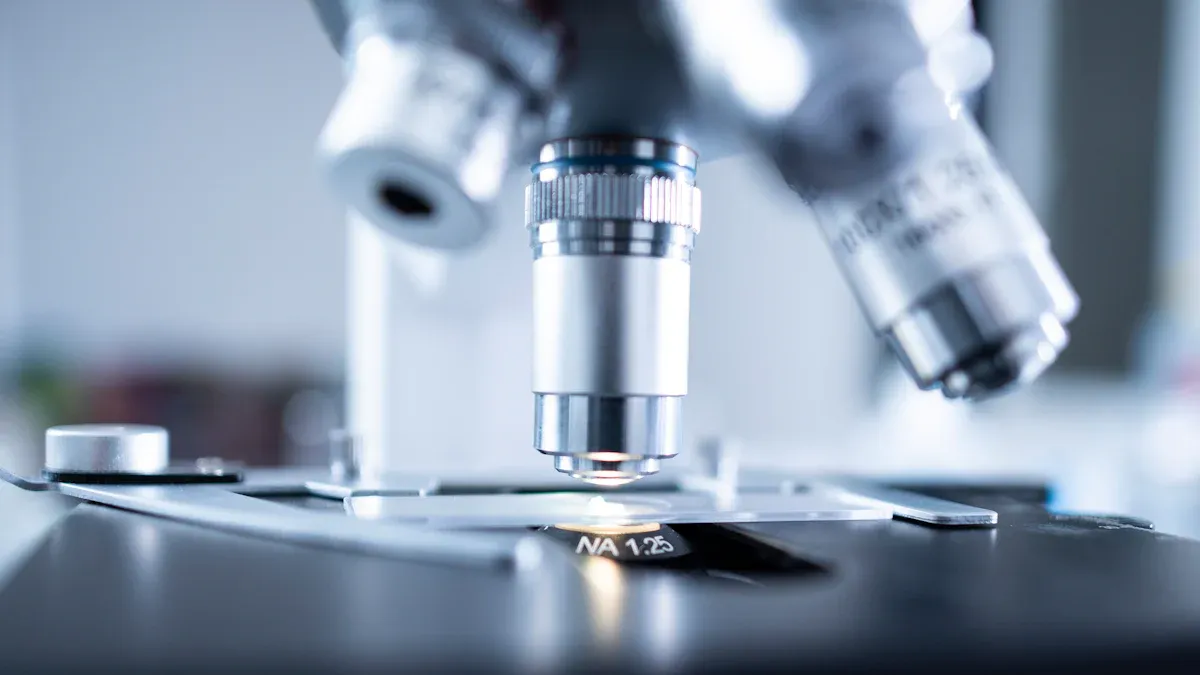
Image Source: pexels
High power objectives let you see very small details. You cannot see these with low power. These lenses can magnify from 40x up to 1000x. Most compound microscopes use 100x or 150x for oil immersion. Look at the table to see common magnification levels:
| Objective Lens Type | Magnification |
|---|---|
| High Power (Standard) | 100x |
| Specialized (Oil Immersion) | 150x |
High power objectives help you study cells and bacteria. You can also see other tiny things. You must focus carefully. Even a small move can change what you see.
When you use high power, the field of view gets smaller. You see less of your specimen at once. But you get to see more detail. The table shows how the field of view changes as you zoom in:
| Objective Type | Field of View Change |
|---|---|
| Scanning Power | Decreases |
| Low Power | Decreases |
| High Power | Decreases |
First, find your area with low power. Then switch to high power to see tiny details.
High power objectives have a shallow depth of field. You can only focus on thin layers at one time. You must use careful focusing to see what you want. High power objectives have a higher numerical aperture than low power ones. Higher numerical aperture gives you better resolution. The chart below shows how numerical aperture goes up with magnification:
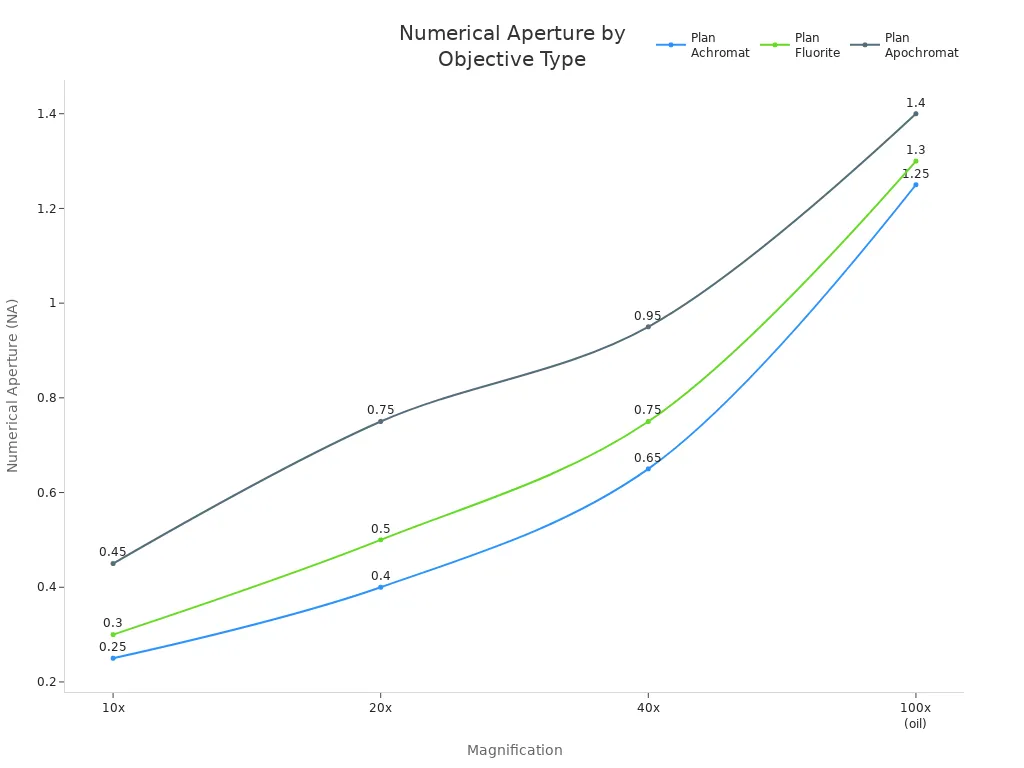
A 100x oil immersion lens can have a numerical aperture up to 1.4. This helps you see tiny things clearly. The microscope’s resolution depends on numerical aperture and light wavelength. Higher numerical aperture lets you see points that are very close together.
You use high power objectives to see very small things. These lenses are great for:
Studying cells and their parts
Looking at bacteria and tiny organisms
Examining fine details in tissues
Scientists and doctors use high power objectives to study diseases. They also use them to research cell structures. You can learn a lot about life with these strong lenses.
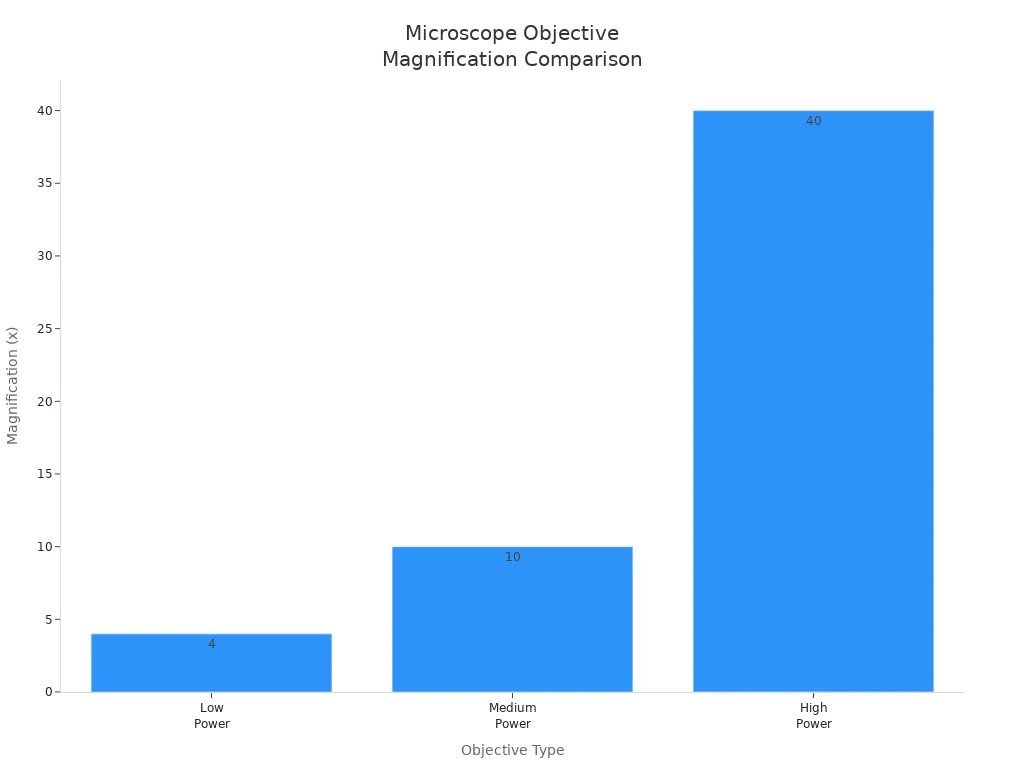
Low power and high power objectives are very different. Low power objectives usually give you 4x magnification. You use this to look for your specimen on the slide. Medium power objectives, like 10x, help you see bigger details. High power objectives, such as 40x or 45x, let you see tiny parts inside cells. When you use higher magnification, you can see smaller things. But if the resolution is not good, the image can look blurry.
| Objective Type | Magnification | Purpose |
|---|---|---|
| Low Power | 4x | Scanning the slide and finding the specimen |
| Medium Power | 10x | Looking at bigger details in the specimen |
| High Power | 40x (or 45x) | Seeing tiny parts inside cells |
Low power objectives have less magnification and resolution. You use them to find and scan your specimen. High power objectives have much more magnification and resolution. You use them to study tiny things you cannot see with low power.
Tip: Always start with low power to find your specimen. Switch to high power if you want to see more detail.
The field of view changes when you change magnification. With low power, you see a wide field of view. You can look at more of your specimen at once. When you use higher magnification, the field of view gets smaller. You see less of your specimen, but you see more detail.
Low power objectives show a large field of view.
High power objectives show a small field of view.
Numerical aperture changes how much light goes into the lens. This affects the field of view and depth of field.
When you switch from low to high power, magnification goes up. But you lose some field of view and depth of field. You need to focus more carefully with high power.
Sample preparation is not the same for low and high power objectives. For low power, you can use simple methods. You might just put a whole mount on the slide. High power needs more steps. You often have to cut, section, or polish the specimen to see small details. Sometimes you need special ways to make the specimen stand out.
| Criteria | Low Power Microscopy | High Power Microscopy |
|---|---|---|
| Accessibility of Features | Easy to see with little preparation (like whole mounts) | Needs cutting, sectioning, and polishing to see features |
| Contrast Enhancement | May use natural contrast | Often needs special ways to make things clearer |
| Specimen Stability | Not as important with low magnification | Very important to keep the specimen clear and stable |
Note: High power objectives need careful sample preparation. This helps you get clear and sharp images.
Low power microscopes are easier to use, especially for beginners. You can look at bigger objects and see them in 3D. High power objectives are harder to use. You must focus carefully and prepare your specimen well. High power works best for small things, like cells and bacteria.
Low power microscopes are simple and good for beginners.
High power objectives are harder and need practice.
New technology lets you switch between high and low power fast. This makes using the microscope easier.
If you are new to microscopes, start with low power. You will learn to find and focus on specimens before using high power.
Use a low power microscope to look at bigger things. It helps you see a wide area at once. You can see the whole specimen before zooming in. Try practicing with things you see every day. Some examples are:
Dollar bill
Newspaper print
Twigs and leaves (compare dead and live ones)
Cat or dog hair
Your house key
Grains of salt and sugar
Your thumbprint
A spider or ant
Low power magnification is great for beginners. You can find what you want to study easily. You will not lose track of your specimen.
High power objectives help you see tiny details. Use high power when you need to be exact. Some tasks need high power magnification, like:
Fluorescence microscopy with oil-immersion objectives
Imaging live cells
Detecting fluorophores in basic and advanced systems
Studying bacteria or cell structures
High power lets you see things low power cannot show. You must focus well and prepare your specimen carefully.
To pick the right microscope for your class or lab, follow these tips:
Choose a microscope with 40x to 400x magnification for most uses. Pick up to 1000x for harder studies.
Get models with metal frames and strong lenses. They last longer.
Look for simple features like easy focus and adjustable eyepieces.
Make sure your microscope has a bright LED light.
Tip: Start with low power to find your specimen. Switch to high power to see more detail.
Think about cost and how easy it is to use before buying. The table below shows prices and features for each type:
| Type | Price Range |
|---|---|
| Low Power Microscopes | $0 - $2183 |
| High Power Objectives | Not specified |
Low power microscopes are easier for students. They need less care and are lighter. High power microscopes are heavier and harder to use. The table below compares their features:
| Factor | Low Power Microscopes | High Power Microscopes |
|---|---|---|
| Usability | Easier for students | More complex to use |
| Maintenance | Lower | Higher |
| Size | More compact | Bulkier |
| Weight | Lighter | Heavier |
| Design | Simpler | Advanced |
Clean high power microscopes often. They can get dusty and need careful handling, especially with immersion oil.
You can notice clear differences between low power and high power microscopes. The table shows what each type is best for and how much they magnify:
| Microscope Type | Magnification | Typical Use |
|---|---|---|
| Low-Power | 4x or 10x | Good for looking at bigger areas. |
| High-Power | 40x | Best for seeing tiny details in cells. |
When you choose a microscope, think about these questions: What size of sample do you want to look at? Do you need to see 3D shapes or tiny details? Will you use it for biology, geology, or something else? How many people will use the microscope? What is your space and budget?
Both types let you learn about the world in different ways. Choose the magnification that fits your needs and have fun exploring!
The low power objective is a microscope lens with low magnification, typically 4X or 10X. It is used to locate and center the specimen and provides a wide field of view.
The function of the low power objective is to scan the specimen, find the area of interest, and focus easily before switching to higher magnification.
The high power objective is a microscope lens with higher magnification, usually 40X. It is used to observe fine details of cells and structures after the specimen has been centered at low power.
The high power objective allows detailed observation of small structures by providing higher magnification, but it requires precise focusing and proper lighting.
The main difference between low power and high power objectives is magnification and field of view. Low power objectives provide lower magnification and a wider view, while high power objectives offer higher magnification and more detail but a narrower field of view.
It is easier to locate a specimen at low power because the wider field of view makes it simpler to see the entire slide and position the specimen correctly.
You should start with the low power objective because it helps prevent damage to the slide and objective lens while making it easier to find and focus on the specimen.
You should use a high power objective after the specimen has been located and focused under low power, especially when observing fine details such as cell structures.
At low power, the field of view is wide, allowing more of the specimen to be seen. At high power, the field of view is much smaller, focusing on detailed areas.
Low power is better for beginners because it is easier to focus, provides a wider view, and helps users learn how to locate specimens before using higher magnification.


